
This guide will lead you through the process of setting up a GoldSrc game of your choice (Half-Life, Opposing Force and so on..) for speedrunning. Use the Table of Contents on the right side to navigate through this guide.
Contents
Setting up the game
Download/Installation
- Purchase
First of all, you’ll need to own Half-Life on Steam (as well as Opposing Force and Blue Shift if you intend to play those). - GoldSrc Package
Once you own the game, it is recommended that you download the game package. This contains all of the necessary files you will need to get started. Once downloaded, extract the archive somewhere (e.g. C:\Games\GoldSrc Package). Depending on which game you want to run, use the specific .bat file to launch the game (i.e Half-Life.bat, Half-Life WON.bat etc). Now that we’re able to play the game, we’ll need to make some changes to the in-game settings and create our own custom configuration in order to prepare.
Settings/Configuration
- In-Game Settings
Launch Half-Life and click ‘Options’ in the menu. - Keyboard
Most of this is up to your own personal preference, but it is highly recommended that you bind your scroll wheel to jump and duck as this will allow you to perform certain movement techniques much easier (unless you are running in the Segmented or TAS categories, in which case this won’t necessarily matter). - Mouse
Most of this is also up to personal preference, but it is highly recommended that you enable ‘Raw mouse input’ if you don’t want mouse acceleration. If you don’t know what that is, skip this step. - Video
Disable ‘Wait for vertical sync’. This stops the game from matching the framerate with your monitor’s refresh rate which is important for when we need to alter the frame rate for various tricks throughout the run. - Userconfig
Pretty much all of these settings (and more) can be saved in a userconfig.cfg file, which is located in the game/mod (i.e valve, valve_WON etc) folder. This will contain any configuration preferences/settings that can only be accessed via the console, therefore it is highly recommended that you create one. You can do this yourself by following the tutorial below (link).
Using Bunnymod XT
Bunnymod XT (AKA BXT) is a powerful external tool that gets injected into the game to enable some features useful for speedrunning such as speedometer, automatic in-game timer etc. It also works with all the official Half-Life expansions like Opposing Force, Blue Shift or even other GoldSrc games/mods like Gunman Chronicles.
Bunnymod XT is useful in any category. It comes bundled with the GoldSRC Package and if necessary, updates for it can be found here.
To use Bunnymod XT, launch Half-Life and then navigate to the Bunnymod XT folder which can be found in your GoldSRC Package installation directory. Launch the Injector application; an external console window will show up. Keep that running in the background to preserve Bunnymod XT functionality. It will close itself once you exit the game.
For a list of commands and info on functionality, see the Bunnymod XT page itself.
IMPORTANT: Do not join VAC-secured servers while BXT is running, otherwise you may get VAC Banned.
Using a userconfig file
Using a custom userconfig file is a way of keeping things nice and neat so you can make easy changes to any command variable. Any time the game starts, this file gets executed and overrides any commands that may be in the config.cfg file. The userconfig used to be named autoexec before the days of Steam. Autoexec may still work but we are going to use userconfig for now.
Locating the file
First we need to find your “userconfig.cfg” file. It is usually found in the “valve” folder of your Half-Life installation. It also can be found in a mod’s folder, e.g. “ag”, “svencoop” and others. If it is not there you can easily create it manually.
Setting up commands
Here are some useful commands that you might want to add to your userconfig file:
name "Player" // your in-game nickname
clockwindow 0 // disables the “freeze” after each loading
default_fov 110 // field of view
cl_showfps 1 // display game's FPS in the top left corner
cl_bob 0 // disables weapon bobbing
You can also bind commands/actions by using the “bind” command.
For example:
bind mwheeldown +jump
In this case, scrolling the mousewheel downwards will execute multiple +jump commands in one actuation.
It is also recommended that you bind all common weapons to certain keys as this will allow you to quickly equip the exact weapon you need without having to navigate through the weapon menu. This can be done like so:
bind 2 weapon_shotgun
In this case, pressing the number 2 key will instantly equip the shotgun.
Configuring the game for SS/RTA speedruns
The configuration process differs for every game, therefore different sections are required for this guide. The steps for Bunnymod XT and LiveSplit configuration are the same for every game.
Make sure you’re familiar with the rules and speedrun categories of the game of your choice. Those can be found at speedrun.com leaderboards: simply navigate to a game’s page, choose your preferred category and on the top right corner click the “Show rules” button.
Quick links:
- Half-Life leaderboards
- Opposing Force leaderboards
- Blue Shift leaderboards
- Gunman Chronicles leaderboards
Furthermore, we recommend adding the configuration commands to your userconfig file so you don’t have to enter them manually each time you want to run the game.
General Bunnymod XT configuration
Every GoldSrc game (with the exception of Decay) requires Bunnymod XT for doing SS/RTA speedruns. The configuration of BXT is essentially the same for all games. There are some commands that you need to know:
bxt_hud_timer – Displays the in-game timerbxt_timer_start – Starts the in-game timer.bxt_timer_stop – Stops the in-game timer.bxt_timer_reset – Resets the in-game timer.bxt_autorecord – Records a demo as soon as the game loads and keeps recording through save reloads.
Since all games use BXT’s in-game timer for speedrun timing, you need to use these commands in a bind when starting a run. For example, a run start bind for Half-Life would look like this:
map c1a0;bxt_timer_reset;bxt_timer_start;bxt_autorecord run
It loads the starting map (c1a0), resets the timer (if it was started previously i.e. previous run attempt) and then starts it again for the run. As of September 2016, all runs submitted to speedrun.com must have demo proof for verification. GoldSrc games usually stop the demo recording if you die and/or reload a save, but BXT can automatically start recording a new demo when that happens, as long as you use bxt_autorecord at the start of the run. More info on setting up demo recording for this rule can be found here.
The timer will keep running through your speedrun and will stop automatically once the game-over event (i.e. Nihilanth’s death) occurs (make sure bxt_autostop is set to 1). Currently the timer will stop automatically only in Half-Life, Opposing Force, Blue Shift and Gunman Chronicles game endings.
For a full detailed list of Bunnymod XT commands, please visit its wiki page.
LiveSplit Auto-Splitter configuration (optional)
If you want to use LiveSplit, there’s an auto-splitter “BunnySplit” available for Half-Life, Opposing Force, Blue Shift and Gunman Chronicles games which can make life easier for you.
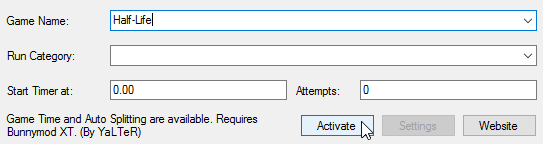
To set up BunnySplit, go to the Splits Editor and enter Half-Life (or any other supported game) in the “Game Name” section. LiveSplit should inform that auto splitting is available. Press Activate and BunnySplit should be downloaded and set-up automatically to work with LiveSplit.
Once Activated, press the Settings button located in the middle. There you’ll be able to enable and set up BunnySplit to your liking.
If set up correctly, LiveSplit should start it’s timer automatically (provided that you have AutoStart enabled) as soon as the bxt_timer_start command is entered in the game, as well as split automatically according to your configuration.
NOTE: There’s about 0.5s delay between LiveSplit and BXT’s in-game timers. Don’t worry, this is not a bug, all autosplits are accurate.
Half-Life
In Half-Life speedruns, there are two game versions that are usually used for speedrunning, both of them are separated in different categories.
- WON version
The original version of the game that has no bunnyhop cap, therefore allowing you to accelerate up to 2000 ups. It also has an FPS limit of 100fps.
If you want to run this version, make sure yourfps_maxsetting is set to 99.5 (if using GoldSrc Package). - Steam version
The latest version of the game, distributed on Steam. This version has a bunnyhop cap that resets your speed whenever you go over 544 ups. On the other hand, you can use unlimited amount of FPS.
Both of these versions are included in the GoldSrc Package, you can launch them by running Half-Life.bat (Steam version) and Half-Life WON.bat (WON version) files.
Opposing Force
Unlike in Half-Life, all Opposing Force speedruns are done using WON version settings. This means that your fps_max value mustn’t be higher than 99.5 (if using GoldSrc Package).
The only difference with Opposing Force is separate categories for RTA and SS runs. This is because the game has techniques involving reloading the saves (this falls into the RTA category), therefore allowing for a completely different route.
- Real Time Attack (RTA) runs
Completing the game as fast as possible in a single sitting with dying and reloading quicksaves being allowed. - Single-Segmented (SS) runs
Completing the game as fast as possible in a single sitting without any save loading involved (or dying).
Opposing Force runs start in the map of1a1 and end on the final hit dealt to Gene Worm. To start a run, you can use this set of commands:
map of1a1;bxt_timer_reset;bxt_timer_start;bxt_autorecord run
This will load the first map and start BXTs in-game timer. If you have timer autostop enabled, the timer will automatically stop upon dealing the final hit to the Gene Worm.